How to Disable WooCommerce Stock Notification Emails
 Tired of struggling with your product descriptions? ProductWriter.ai can use your existing data and the
power of artificial intelligence to write high-quality product descriptions for you in seconds. Get started for free!
WooCommerce offers some basic level of inventory control. You can keep track of how much stock you have for a product inside of the admin. As each order comes in, this amount will be decreased appropriately. You can even show, on your product pages, how much stock you have left in inventory while customers are shopping. In addition, WooCommerce can send out emails when products are low or completely out of stock. You can disable WooCommerce stock notification emails in several ways. Today, we’re going to discuss three possible solutions for turning those stock notification emails off.
This article discusses how to turn off stock notification emails. We won’t be discussing how to remove WooCommerce stock messages from your theme and templates. There is an article, and plugin, available on our site to help you with that.
How to Remove WooCommerce Stock Notification Emails with WooCommerce Inventory Settings
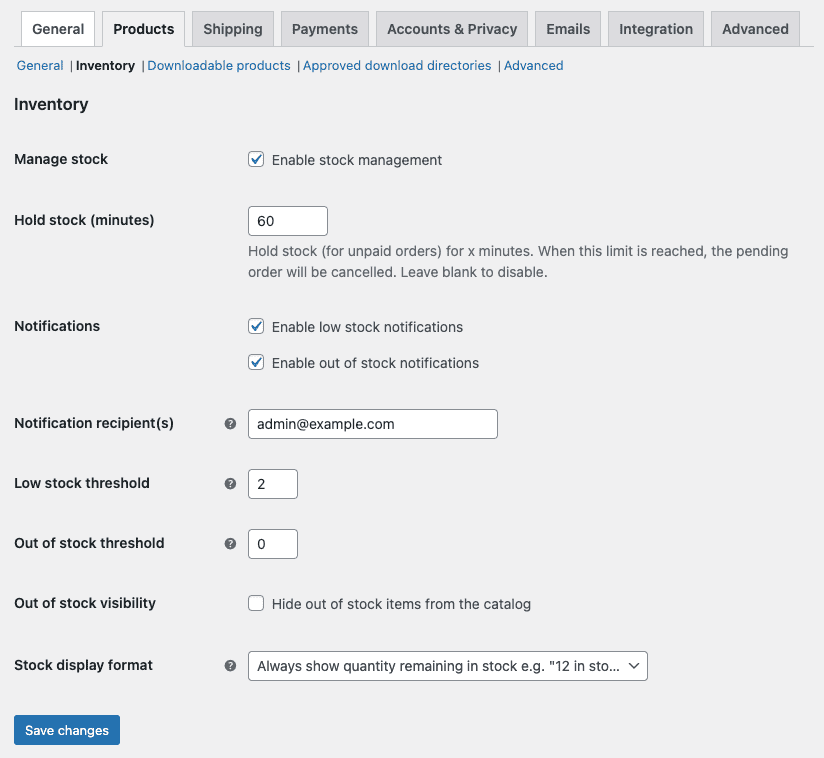
WooCommerce does have inventory and stock settings you can adjust. They are a bit difficult to find if you don’t know where to look. First, you’ll want to access the Settings screen of WooCommerce. Next, select the Products tab and click the Inventory link directly underneath. It should look something like this:

The parts we are interested in are under Notifications. This is where, by checking a box, you can turn off or turn on the two main notification emails. Low stock notifications will go out whenever a product hits its low stock threshold value. You can find that value on the Inventory tab of your individual products in the admin. The no stock notification will send, obviously, when the stock quantity of a product hits zero.
Other Options to Disable WooCommerce Stock Notification Emails
So, that seems simple enough. And you might think that will work and get you the results you need. To be honest, it’s pretty likely that toggling off those checkboxes and saving the changes will be all you have to do. Unfortunately, we’ve had reports from users that certain plugins ignore these settings. Also, it’s possible you might want to permanently disable stock notification emails regardless of the status of those checkboxes in your settings.
We’ll now go through two other ways to turn stock notification emails off in WooCommerce. The first will involve you writing some code and getting your hands dirty. The last solution, best for non-technical users, will feature a small plugin we sell that handles this problem in minutes.
How to Remove WooCommerce Stock Notification Emails with Code
We’re about to teach you a little bit about code and how WooCommerce works inside. This is going to be pretty technical but we’ve made it as simple as we can. Get ready to crack open a text editor and learn about file compression.
Warning! Make a complete backup of your site before you begin. You should be backing up your store’s database, plugins, theme, and uploads regularly already. In case of disaster, a complete and working backup will get you running again. We recommend hiring a company that offers WordPress maintenance packages if you don’t want to worry about this yourself.
Create a WordPress Child Theme
WordPress, the content management system used by WooCommerce, has a great theme system. In fact, it’s so great that a lot of people can easily modify any theme on their own. Unfortunately, they often do that in an unsafe way by editing theme files directly. This is a bad idea for a lot of reasons but, first and foremost, changes made to a theme are lost in future updates. In other words, when a theme receives an update it downloads new files and those files overwrite any you have changed. Your updates are lost.
Thankfully, the developers behind WordPress have a solution for this, and its called a child theme. A WordPress child theme uses another theme, called the parent, as a base. You can add templates and code to a child theme and when the parent is updated nothing is lost. This is the safest and most secure way to modify a theme which is what we’ll be doing today to turn off stock emails.
Creating a child theme is easy but slightly out of the scope of this guide. You can create your own WordPress child theme using a generator or by hand. Once that’s done, return to this article to continue.
Add Code to the Child Theme
Now it’s time to add some code to your newly created child theme. Find the functions.php file. If it doesn’t exist, make one, and then open it up in a text editor. You’ll want to copy and paste this code into the functions.php file:
add_action('woocommerce_email', my_remove_stock_notification_emails, 10, 1);
function my_remove_stock_notification_emails($email_class) {
    remove_action('woocommerce_low_stock_notification', [$email_class, 'low_stock']);
    remove_action('woocommerce_no_stock_notification', [$email_class, 'no_stock']);
}
There are two things to understand about this code. It turns off both the low stock and no stock emails. If you only want to turn off low stock emails, only include line #3. If you only want to turn off no stock emails, only include line #4.
Save the file when the code is set up how you want it to be. Now we need to package your child theme up and get it on to your WooCommerce store.
Upload the Child Theme
You are ready to upload your child theme to your site. First, compress the child theme’s folder into a .zip file. This file format is necessary to upload directly to WordPress. Next, log in to the WordPress admin and navigate to the Themes screen which can be found under Appearance in the menu. From the Theme screen, upload your child theme using the interface that is provided.
Alternatively, you can upload the child theme folder directly to the server using FTP. This is, in an article already very technical, even more, suited for advanced users. Your web hosting provider, and support staff, should have documentation available if you want to try this route. We recommend you just go with the first option to save time and headaches.
Text editors? Zip files? Is this too much for you to take on? We understand. This level of effort isn’t for everyone and most e-commerce site owners are busy. If you want a faster, simpler, and more efficient solution to remove WooCommerce stock notification emails we have the answer. Check out our simple plugin to learn about a quicker way.
Activate the Child Theme
We’ve reached the final step. It is time to turn on or activate, the child theme. On the Themes screen, you should now see your child theme amongst the list of options. If not, there was an issue with your upload. Repeat the process until you see your theme. Click the button to activate it.
Immediately, your store should no longer be sending stock notification emails. If your site is still sending emails, or it’s broken in some way, then there was an issue with your child theme and your code. Check everything again, fix the error, and then repeat the upload and activation process. Eventually, through trial and error, you will get the result you are looking for.
You did it! You’re a WooCommerce developer now. You learned about code, child themes, and more. Of course, that’s a lot of work and effort for something so simple. Let’s talk about an easier solution.
Remove WooCommerce Stock Notification Emails the Easy Way
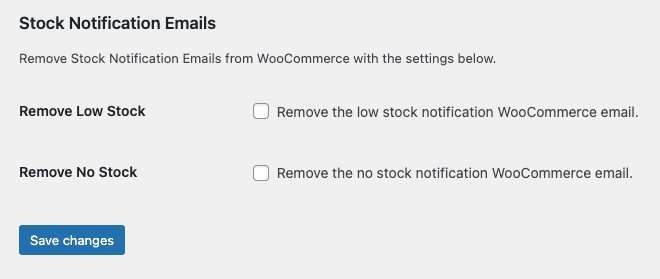
We have created a plugin that lets you turn off WooCommerce stock notification emails without all of the hassle and heartache we dealt with above. The plugin has a simple settings screen that lets you individually decide which emails work and which are turned off.
Purchasing and installing our plugin is simple. You won’t have to worry about anything technical. That means you won’t have to create a WordPress child theme. No text editors or FTP programs will need to be used. There will be no code. Our plugin handles it all. Your only requirement is to install and activate it. We will email you detailed installation instructions after purchase in case you need help.
After installation, you’ll discover a Remove Features tab in the settings screen of WooCommerce. This interface is where you get to pick which stock notification emails to disable from your store.

That’s all there is to it. Mark the boxes of each email notification you want to turn off and then save your changes. Immediately, with no further effort from you, the selected emails will be disabled.
When you purchase our plugin you get:
- 90 days of support. Get help with your plugin up to three months after purchase.
- No license keys or yearly subscriptions. Pay $14 once.
- Unlimited installations. Install the plugin on as many sites as you want.
We offer a 14-day money-back guarantee. Get a full refund if you are unhappy with our plugin or if it doesn’t meet your expectations.
