How to Remove the WooCommerce Product Image Link
 Tired of struggling with your product descriptions? ProductWriter.ai can use your existing data and the
power of artificial intelligence to write high-quality product descriptions for you in seconds. Get started for free!
The product page is the heart and soul of any online store. WooCommerce, the most popular e-commerce software solution out there, has thousands of themes available with pre-built product page templates. These templates come with a host of features and functionalities. One of the most common of those is to allow users to click on and view an image of a product. Of course, you might prefer it if that option wasn’t possible and the image link was disabled. Today, we’ll show you how to remove the WooCommerce product image link from your store.
We’re going to cover two ways to accomplish this task. First, we’ll show you how to safely and securely make an addition to your current WooCommerce theme. Then, if that approach seems too technical for you, we’ll discuss how a simple plugin we’ve developed can disable the WooCommerce product image link for you quickly and easily.
How to Remove the WooCommerce Product Image Link with Code
Let’s go through the process of writing some PHP code to include in your WooCommerce theme. This part is going to be technical. We’ve done our best to make it as simple as possible. You will need to get your hands dirty though.
Warning! Before getting started we always recommend you make complete and total backups of your site. It’s possible you will make a mistake that could cause your store to break or stop working. A complete backup (database, theme, plugins, and uploads) is always a good idea. In case of an emergency, you can restore that backup and get back to where you were. Not sure how to do proper backups? You might want to find a firm offering WordPress maintenance packages to help you.
Build a WordPress Child Theme
Never, under any circumstances, make any modifications to a theme directly in the files themselves. A lot of tutorials will tell you to add code to a theme without giving the ramifications any thought. WordPress has a built-in system to modify themes safely and without issues that you should take advantage of.
A child theme, as the name implies, is a simplified theme that uses parts of another theme to work. The other theme, called the parent, is what your WooCommerce store is currently using. Your child theme is where we will be adding code to remove WooCommerce product image links. The reason we use a child theme is simple. T changes you make to a parent theme’s files are lost in future updates. A child theme will never have changes replaced no matter how often the parent theme updates. So a child theme ensures our code will always be there and working in the future.
Creating a child theme is a simple process but a bit beyond the scope of this focused article. You can find a lot of really great guides and tutorials online though. You can create your own WordPress child theme by following one of those articles and then come back here when you’re done.
Include Code in Your Child Theme
Every theme has a file called functions.php. Your child theme should be no different. If you don’t have one, make it now, and then open it up in a text editor. Copy and paste this code into that file and then save it.
add_filter('woocommerce_single_product_image_thumbnail_html', my_remove_product_image_link, 10, 1);
function my_remove_product_image_link {
    return strip_tags($html, '<div><img>');
}
Simple enough. Keep in mind a few things though. This piece of code you’ve added will disable the WooCommerce product image link from your entire site. It applies to every product. You have no control over individual products or categories. This is a one size fits all type of solution. We’ll discuss more discrete options when we tell you about our plugin.
Now that you’ve added the code and saved the file it’s time for the next step. You’ll need to package up your child theme and upload it to your site’s server.
Upload Your Child Theme
The easiest way to add a new theme to a WooCommerce site is through the WordPress admin. You will need to compress your child theme’s folder into a .zip file first. When that’s ready, log in to the WordPress admin and navigate to the Themes area. This is located under the Appearance menu. From the Themes screen, upload your new theme through the interface provided.
As an alternative, if you feel adventurous, you can upload the theme to the server directly. You won’t need to compress the theme into a .zip file for this. You will, on the other hand, need to be familiar with how FTP works. Your web hosting provider will have documentation to help you with this.
Compressed Zip Files? FTP? This article, as we warned, is a bit technical for novices. Creating child themes and file editing isn’t for everyone and that’s fine. If you want a faster, safer, and more efficient way to remove WooCommerce product image links we have a solution. Check out our simple plugin for an easier way.
Activate Your Child Theme
The final step!
After you have uploaded your child theme, it is time to activate it on your site. Activation is just another word to describe how a theme is turned on. Head back to the Themes area of the WordPress admin. You should see your child theme among the list of options. If not, try the upload process again until it shows. When it’s there, simply click the button to activate it.
Once activated, the product image links on your site should vanish immediately. If the links are still there or your site has other problems then you made a mistake with the code. Edit your functions.php file again to fix the problem, and repeat the upload and activate process again. Eventually, you will get things working correctly.
Congratulations. You’ve managed to create a WordPress child theme, add PHP code, and install and activate it on your site. Or, if you’ve gotten this far and are still confused, read ahead to learn about a much easier solution.
Disable the WooCommerce Product Image Link the Easy Way
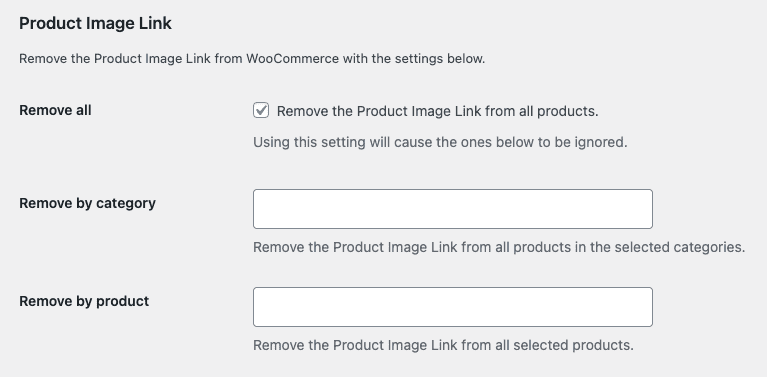
We have created a simple plugin that lets you disable the WooCommerce product image link from your store. In fact, our plugin is much more flexible than the piece of code above. It’s the best solution available.
You can use our plugin to remove the product image link from:
- All Products
- Products in Specific Categories
- Specific Products
Purchasing and installing our plugin takes a few minutes. You won’t have to write a single line of code. You won’t have to make a child theme or do anything technical at all. Is this your first plugin purchase? Don’t worry. We’ll email you step-by-step instructions to install and activate the plugin.
After installation, you’ll have a find a Remove Features tab in your WooCommerce settings. This is where you can decide exactly which products or categories have the link removed.

That’s all there is to it. Our plugin gives you greater control than our code example and it’s not technical at all. You’ll be up and running in minutes.
Your plugin purchase comes with:
- 90 days of support. Get help with your plugin up to three months after purchase.
- No license keys or yearly subscriptions. Pay $14 once.
- Unlimited installations. Install the plugin on as many sites as you want.
We offer a 14-day money-back guarantee. Get a full refund if you are unhappy with our plugin or if it doesn’t meet your expectations.