How to Remove WooCommerce Order Item Details
 Tired of struggling with your product descriptions? ProductWriter.ai can use your existing data and the
power of artificial intelligence to write high-quality product descriptions for you in seconds. Get started for free!
Many people think of WooCommerce as a storefront. Of course, that’s true and much of the interaction done on a WooCommerce site is through customers on the front-end. But there’s a powerful admin side to WooCommerce as well. You can use WooCommerce to manage data for your customers, orders, and much more. In terms of orders, the entire process from receiving, to packing, to shipping can be handled inside of the admin. The problem is that WooCommerce’s admin is not very customizable. For example, if you wanted to remove WooCommerce order item details from the admin you would need to do a lot of work.
What are order item details? Inside of WooCommerce, you can review each order you have received. In addition to things like the order’s customer, the totals, and shipping information, are a list of the individual items on the order. This list of items can contain a lot of extra details that might be irrelevant or unnecessary to you as the store owner. The possible list of details includes:
- Item Thumbnail
- Item Name
- SKU
- Variation ID
- Item Cost
- Quantity
- Item Total
- Line Items
- Fees
- Shipping
- Refunds
- Order Totals
- WooCommerce Actions
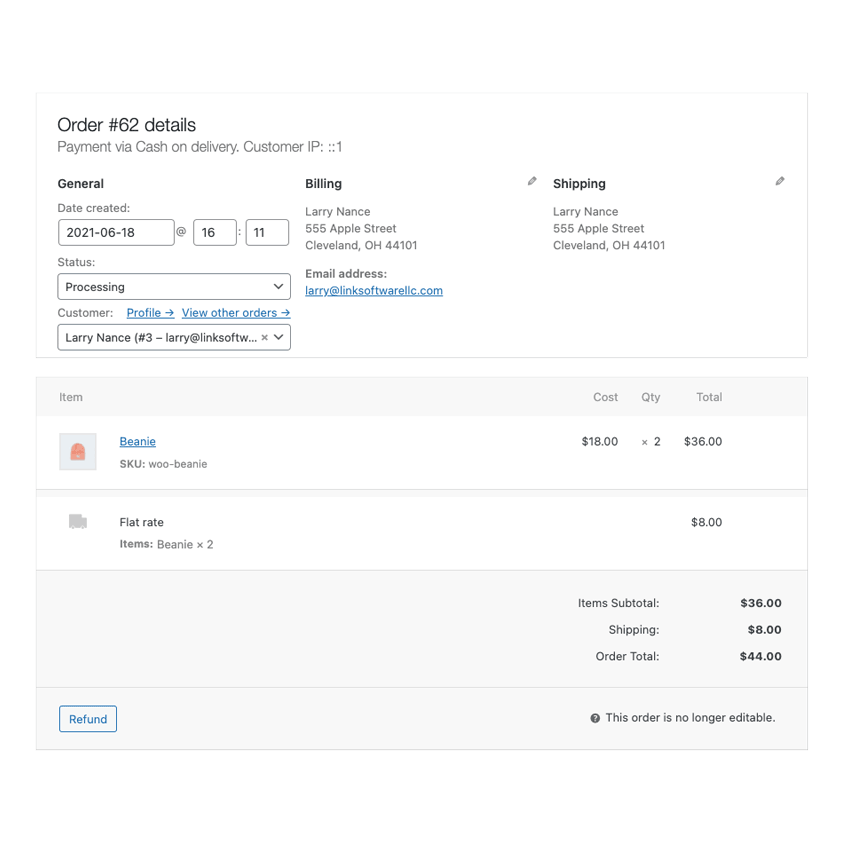
Here’s an example screenshot of what a common list of order item details looks like inside of the WooCommerce admin:

As you can see, that’s a lot of information. You might not need, or necessarily want, some of these details visible to your staff as they use your site. Today, we’ll go through the steps you need to take in order to disable WooCommerce order item details from your store. There are two ways to do this. The first involves making a special version of your theme, adding some custom code, and then turning your special theme on. The second is using our very simple WooCommerce plugin that can handle this for you in a few steps. We will walk you through how to purchase our plugin and use it at the end of this article.
How to Hide WooCommerce Order Item Details with Code
Prepare yourself because we are about to get pretty nerdy. You can hide WooCommerce order item details with some custom CSS code added to your store. Of course, simply adding your own code to your site is always a bad idea. We’ll go through how to safely add custom code to a WooCommerce site without wrecking the entire thing and causing downtime.
First, be safe! Before we go any further make sure you have a working backup of your site. Your backup should include all of your core WordPress files, plugins, the store’s theme, and database. Regular backups are the best way to prevent data loss and disaster. In case you make a mistake today, you’ll want to recover from a working set of backups. If you don’t know how to do backups or want help doing them regularly, look into finding a company offering WordPress maintenance packages to assist you.
Create a Child Theme
The first step is to make a place for your code to run safely. For this particular feature removal, which is admin-only, you could make a custom WordPress plugin. As a beginner, and to make sure you can easily make more changes to your site in the future, we recommend you create a WordPress child theme.
What is a child theme? Basically, a child theme is a regular WordPress theme that uses another theme as its foundation. The other theme, called the parent, drives most of the site’s front-end. Your child theme will simply inject its own code and modifications into the parent. This is important because modifying a parent theme’s code directly is always a bad idea. For starters, you can easily ruin a theme with a mistake, and going back is difficult. Also, when you modify a WordPress theme your changes are lost the next time it receives an update. Your child theme, on the other hand, will never have its code modified when the parent receives a change. Your child theme’s code is always left untouched.
Creating a child theme is a bit outside of the scope of this tutorial. Instead, you should find one of the dozens of thorough tutorials online. You can learn how to create a WordPress child theme and be ready to move on to the next step quickly.
Add Code to the Child Theme
It’s time to add some CSS code to your child theme. Because we’re working with the admin interface the CSS needs to be loaded in an unusual way using PHP. Every child theme should have a file called functions.php. This is where your code is going to live. Create a functions.php file if one doesn’t exist in your child theme already. Open the file in a text editor and then insert this code:
add_action('admin_enqueue_scripts', $plugin_admin, 'my_admin_order_item_details', 10);
function my_admin_order_item_details()
{
    $css = '';

    /* Item Thumbnail */
    $css .= "#woocommerce-order-items .inside table.woocommerce_order_items .wc-order-item-thumbnail { display: none !important; }";

    /* Item Name */
    $css .= "#woocommerce-order-items .inside table.woocommerce_order_items .wc-order-item-name { display: none !important; }";

    /* SKU */
    $css .= "#woocommerce-order-items .inside table.woocommerce_order_items .wc-order-item-sku { display: none !important; }";

    /* Variation ID */
    $css .= "#woocommerce-order-items .inside table.woocommerce_order_items .wc-order-item-variation { display: none !important; }";

    /* Item Cost */
    $css .= "#woocommerce-order-items .inside table.woocommerce_order_items .item_cost { display: none !important; }";

    /* Quantity */
    $css .= "#woocommerce-order-items .inside table.woocommerce_order_items .quantity { display: none !important; }";

    /* Item Total */
    $css .= "#woocommerce-order-items .inside table.woocommerce_order_items .line_cost { display: none !important; }";

    /* Line Items */
    $css .= "#woocommerce-order-items .inside tbody#order_line_items { display: none !important; }";

    /* Fees */
    $css .= "#woocommerce-order-items .inside tbody#order_fee_line_items { display: none !important; }";

    /* Shipping */
    $css .= "#woocommerce-order-items .inside tbody#order_shipping_line_items { display: none !important; }";

    /* Refunds */
    $css .= "#woocommerce-order-items .inside tbody#order_refunds { display: none !important; }";

    /* Order Totals */
    $css .= "#woocommerce-order-items .inside div.wc-order-totals-items { display: none !important; }";

    /* WooCommerce Actions */
    $css .= "#woocommerce-order-items .inside div.wc-order-bulk-actions { display: none !important; }";

    wp_register_style('my-order-item-details', false);
    wp_enqueue_style('my-order-item-details');
    wp_add_inline_style('my-order-item-details', $css);
}
Please bear in mind this will hide the selected order item details for all user roles. So, for example, if you hide the SKU detail it will not display for administrators or shop managers. This code snippet doesn’t offer finer control than that.
Save the functions.php file when you are done. Keep in mind that you only want to use the lines of code that match the details you want to remove. So, if you want to keep the SKU, don’t add that line of code to your functions.php file.
Getting confused yet? Don’t worry. This is a lot to take in for non-technical users. Most WooCommerce store owners won’t want to bother going through this process. Making a child theme, inserting this complicated block of PHP code, and turning it all on is a pain. You can dramatically shorten this process with our plugin. Learn how our plugin can help you save time.
Upload the Child Theme
It’s time to get your child theme on your website’s server. First, you’ll need to compress your child theme’s folder into a .zip file. This is required in order to upload the theme through the WordPress admin. In order to do that, log in to the admin and head to the Themes section under the Appearance menu. You’ll be able to upload your theme from this simple interface very quickly.
Some people prefer to upload their themes, uncompressed, directly to the server themselves. You’ll need an FTP program and login credentials to do this. Your web host should have a knowledge base, or support staff, to assist you in getting the right server details and account information. With that in hand, you can upload your child theme folder directly to the server in the wp-content/themes folder.
Activate the Child Theme
We’ve reached the final step! Your child theme is successfully uploaded as long as you can see it back on the Themes screen we visited earlier. If your theme isn’t available there was an issue with the upload. Try again until the theme finally shows on the list of available themes installed on your site. You activate, or turn on the theme, by pressing the activation button next to your child theme’s listing.
Your code should have an immediate impact on your admin. In fact, the very first order you look at should have the order item details you want to hide no longer on display. When the order item details are still there, or your entire site is down because of errors, there is an issue with your code. Check your functions.php file for mistakes, re-upload the theme, and activate it again. Eventually, you’ll get the result you want.
That’s how you remove WooCommerce order item details from the admin. It’s quite an involved process and you’ll have learned a lot about WordPress development by the end. Of course, there is a much easier and faster way to handle this. Let’s learn how our plugin can help you take care of this project in minutes.
Remove WooCommerce Order Item Details the Easy Way
We have built a simple plugin that lets you turn off individual WooCommerce order item details from your site’s admin. The plugin includes an easy-to-use settings interface that lets you decide which order item details should be hidden. It even allows you to decide what details to remove based on a user’s role: administrator or shop manager.
Purchasing and installing our plugin is easy. You won’t need to learn about or build your own WordPress child theme. There’s no need to use a text editor or copy and modify pieces of code. You’ll simply install our plugin and be up and running quickly. We will email you full installation instructions after you complete your purchase. In the end, you will be ready to go in under a minute.
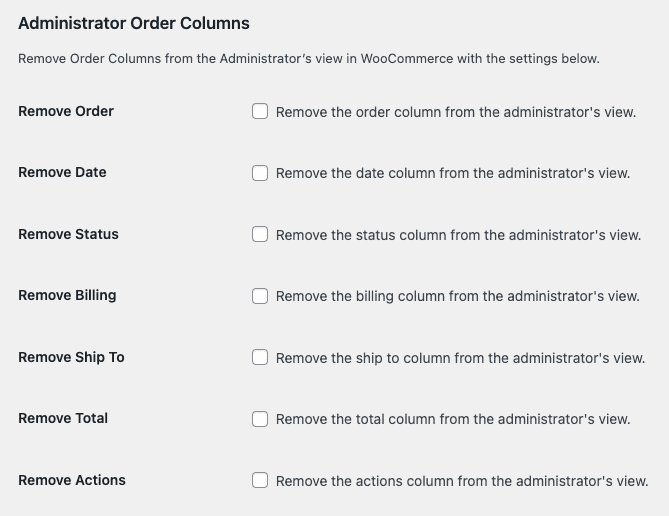
After installation, you’ll find a new Remove Features tab in WooCommerce’s settings. This is where you get to decide which order item details to hide. These settings cover the two main WooCommerce user roles: administrator and shop manager. For example, here is what our plugin’s settings interface looks like for administrator order item details:

All you have to do is check the box for the item detail you want to hide. There is a similar area for shop managers as well. Once you have made your choices you save your changes and the plugin does the rest of the work. Immediately after you save, all of the selected order item details will disappear.
When you purchase our plugin you get:
- 90 days of support. Get help with your plugin up to three months after purchase.
- No license keys or yearly subscriptions. Pay $14 once.
- Unlimited installations. Install the plugin on as many sites as you want.
We offer a 14-day money-back guarantee. Get a full refund if you are unhappy with our plugin or if it doesn’t meet your expectations.