How to Remove WooCommerce Order Columns
 Tired of struggling with your product descriptions? ProductWriter.ai can use your existing data and the
power of artificial intelligence to write high-quality product descriptions for you in seconds. Get started for free!
WooCommerce has a very robust and excellent interface in the WordPress admin. You can use the features of the admin to handle all of the day-to-day tasks an online store requires. From the admin, your staff can deal with orders, work with products, take care of customer records, and access all kinds of in-depth reporting features. Unfortunately, some of this admin-side information can be unnecessary or not something you want your employees to see. This is particularly true when it comes to the list of orders. Thankfully, you can remove WooCommerce order columns from the admin.
WordPress, by default, lets you hide columns using its Screen Options feature. You can decide which columns you want to hide by simply unchecking a box and hitting the Apply button. Unfortunately, this technique is limited in its usefulness. For instance, there are no role controls on these checkboxes. The admin of your site has the same set of choices as the shop manager. Finally, these columns can not be hidden permanently. Anyone can simply check the box and bring a column back into view.
Today, we’ll walk you through how you can permanently remove WooCommerce order columns from the WordPress admin. The first technique we will show is the most complex. It will involve creating a WordPress child theme, adding some custom PHP code to that theme, and then uploading it to your site. The second, much simpler method, uses our very own WooCommerce plugin to handle this all for you automatically. We’ll show you how to purchase our plugin and use it at the end of this article.
How to Hide WooCommerce Order Columns with Code
This is going to get a bit technical. In order to hide WooCommerce order columns, you’ll need to add some custom PHP code to your store. But, first, in order to do this properly, a child theme must be created. If all is done correctly, your chosen order columns will immediately be disabled from your admin. Let’s go piece-by-piece through this whole process so you can see it through to the end successfully.
Alert! We highly recommend you make a complete and full backup of your WooCommerce site before beginning. A total backup (database, WordPress files, plugins, theme, etc.) is something you should be doing regularly already. If there is a problem, a proper backup can get your site back up and running quickly. For those not doing regular backups, consider finding a company offering WordPress maintenance packages to handle the details for you.
Create a Child Theme
The last thing you want to do is make direct modifications to your site’s code. In this example, we’re making changes to the admin so modifying WordPress Core is out of the question. You can create a simple plugin for this change we are about to undertake. Or, if you plan on making more modifications in the future, a child theme is probably the best route to take.
In short, a WordPress child theme uses your existing theme (referred to as the parent theme) as a base. It loads the parent theme’s files first and then its own afterward. Why is this important? When the parent theme receives an update there will be no impact on the child theme. This means that any code or changes in your child theme won’t be lost when the parent theme is modified. It also means you lower the risk of breaking your site if your child theme has a problem. You can always revert back to the parent theme quite easily.
We aren’t going to show you how to create a child theme in this article. There are a lot of tutorials and guides on how to create a WordPress child theme online. Once you have that ready to go it’s time to start adding some custom code to your child theme.
Add Code to the Child Theme
Child themes include a file called functions.php. This is where you put your custom PHP code that will impact your site. It’s possible your child theme doesn’t have the file already. Create the functions.php file yourself, in that scenario. Open it up in a text editor when you are ready and insert this code:
add_filter('manage_edit-shop_order_columns', 'my_admin_order_columns', 10, 1);
function rwf_admin_order_columns($columns)
{
    unset($columns['order_number']);
    unset($columns['order_date']);
    unset($columns['order_status']);
    unset($columns['billing_address']);
    unset($columns['shipping_address']);
    unset($columns['order_total']);
    unset($columns['wc_actions']);

    return $columns;
}
This code is rather interesting compared to some others we have on the site. Essentially, each line is potentially removing one of the columns from the order list in the WooCommerce admin. Here’s a breakdown, by line, so you know which code you need to fit your requirements:
- Order: Line #4
- Date: Line #5
- Status: Line #6
- Billing: Line #7
- Ship To: Line #8
- Total: Line #9
- Actions: Line #10
So keep the lines in that PHP code that match up with the columns you want to remove from WooCommerce. Remove the lines for the columns you want to keep. It’s counter-intuitive but it makes sense if you give it some thought.
One thing to keep in mind is that this code doesn’t consider user roles. So, for example, removing the date column will remove it for all users who have access to your admin. This isn’t always ideal as sometimes you will want the administrator users to have access to more information than a shop manager.
Save the functions.php file. Your new code won’t work if you don’t save the file so this step is important and often overlooked.
Worn out yet? This is a lot of work to remove some columns from a website. A lot of WooCommerce users aren’t cut out for this kind of technical task. Thankfully, you can take care of this process in a much simpler way with our plugin. Find out how our plugin can help you save time (and frustration) today.
Upload the Child Theme
Now that your child theme is ready it is time to upload it to your site. The first step is to get your child theme in a format WordPress can accept. This means you have to compress the child theme’s folder into a .zip file. Once that is done you can head over to the WordPress admin to handle the rest.
Log in to the WordPress admin and head to the Themes area. You can find this under the Appearance menu option. The Themes area will have buttons that allow you to upload your theme from your computer and straight to your server.
Another popular option, that doesn’t require a .zip file, is to upload the folder directly to the server with FTP. You’ll need an FTP program and the login information necessary to make this happen. Again, like creating a child theme, teaching you about FTP is outside of the scope of this post. Fortunately, many web hosting providers offer really excellent documentation and live support to help you take this approach if you want.
Activate the Child Theme
There’s only one step left and you’re all done. It’s time to actually turn your child theme on.
Once again, head to the Themes section of the WordPress admin. You should see your child theme amongst the list of themes that have been uploaded to your site. If your child theme doesn’t appear then there was a problem with the upload. Try again until you are successful and the child theme appears. All you need to do now is press the button to activate the theme. This will make your child theme “activate” and running your store.
The change to the WooCommerce order columns should be immediate. You will know there is an issue with the PHP code you added to your child theme if the columns are still displaying. In this situation, open up your functions.php file again and make sure there are no errors with your code. Once you have corrected the problem, you’ll need to repeat the upload and activate process again.
It might take some trial-and-error but you will eventually be successful. You will have created a child theme, added code to hide WooCommerce order columns, and made it active on your site. That was quite a lot of work. Of course, there is a much easier (and more useful) way to achieve this. Let’s learn how our plugin, Remove WooCommerce Features, can handle all of this for you in a matter of moments.
Remove WooCommerce Order Columns the Easy Way
We have developed a plugin that lets you remove WooCommerce order columns from your site’s admin. The plugin comes with a simple settings screen that lets you pick and choose exactly which columns are hidden. It even lets you pick columns to hide based on a user’s role: administrator or shop manager.
Purchasing and installing our plugin is simple. There’s no need to make a WordPress child theme. You won’t be asked to open up a file in a text editor or copy any code. Everything is handled by the plugin itself. Your only job is to upload the plugin to your site and make some settings decisions. Never installed a plugin before? No problem. We will email you complete instructions after your purchase is finished. The whole process to install and activate the plugin takes less than a minute.
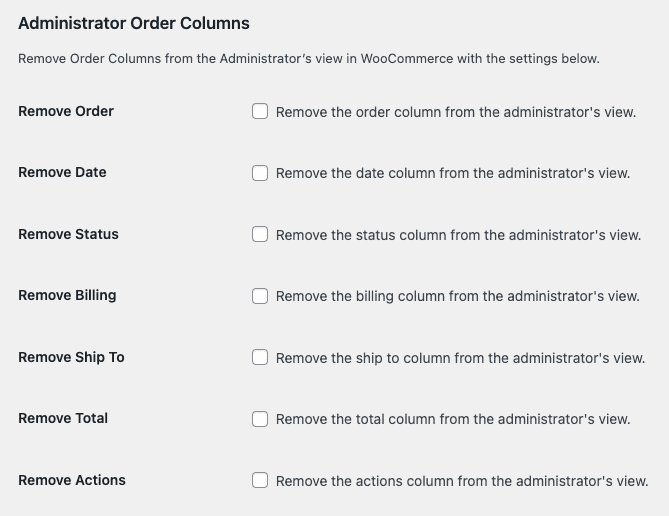
After installation, you’ll see a Remove Features tab in the settings screen of WooCommerce. This is the area you go to in order to pick which order columns to disable. There are settings for the two main user roles: administrator and shop manager. For example, here is what the plugin’s settings look like for the administrator order columns:

So you just need to do check the boxes of each column you want to remove from the orders screen. Save your changes and the columns will immediately be turned off. There’s nothing else for you to do or worry about.
When you purchase our plugin you get:
- 90 days of support. Get help with your plugin up to three months after purchase.
- No license keys or yearly subscriptions. Pay $14 once.
- Unlimited installations. Install the plugin on as many sites as you want.
We offer a 14-day money-back guarantee. Get a full refund if you are unhappy with our plugin or if it doesn’t meet your expectations.