How to Remove WooCommerce Cart Product Links
The cart template provided by WooCommerce is a pretty inflexible piece of the plugin. The default layout comes with a lot of small design choices and pieces of information that are not always worth including and can sometimes be frustrating for store owners to have to deal with.
One such feature is the automatic inclusion of product links inside the cart’s list of items your customers are purchasing. Cart links are meant to give your buyers an easy way to go back and look at what they have in their cart in more detail.
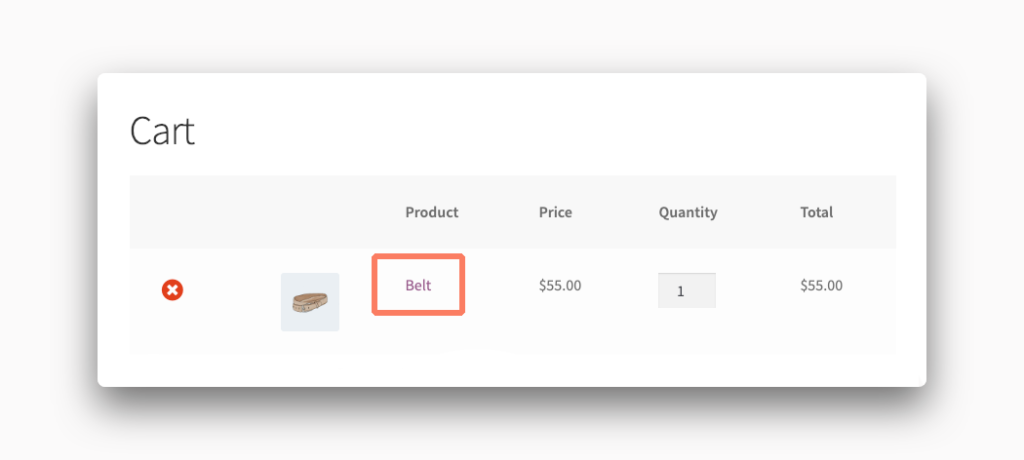
Of course, you might not want to give them that choice or perhaps you are adding items automatically to the cart and don’t need that extra piece of navigation to be available.
A little bit of theme editing is all you need to remove these product links from the cart.
How to Hide WooCommerce Cart Product Links with Code
You can take care of this yourself if you aren’t afraid to learn a bit about the inner workings of WordPress themes. We’ll give you a brief rundown of the process of safely adjusting WooCommerce store layouts with code.
Warning! Please make a complete backup of your site. This includes your WordPress theme and the site’s database as well (just to be safe). If something goes wrong you will need to be able to revert back to a working version of your site.
Create a Child Theme
The first step is to create a child theme. You can learn how to create a WordPress child theme online. Child themes are a way for WordPress site owners to adjust their site’s layout safely. In short, a child theme will load its parent theme’s files first and then apply any changes it might have last. This method allows for a parent theme to receive updates and fixes without risking any loss of code.
Add Code to the Child Theme
Once the child theme is ready it is time to add some code to it. Create a file called functions.php inside of your new child theme. This is the file where we will be inserting our code. Open the file in any text editor and add the following:
add_filter( 'woocommerce_cart_item_permalink', 'my_remove_cart_product_link', 10 );
function my_remove_cart_product_link() {
    return __return_null();
}
It’s important to understand how this code works. This is a universal change across all products on your site. Every product, in every category, will have its link removed from your cart template by using this code snippet. You can not get product-by-product control using this particular chunk of code.
Save your functions.php file and you are ready to move on to the next step.
Upload the Child Theme to Your Site
This next step can be pretty technical. You’re going to need to use an FTP program to upload your child theme to the site’s server. Your web host should have instructions on how to get this done. Some hosting providers also offer assistance through their support staff as well. Once you have the child theme files on the server it’s time to turn it on.
Activate the Child Theme
You should be able to go to the Appearance menu inside of the WordPress admin and see your theme. Activate it and, if everything has gone smoothly, the product links should be removed from your cart.
If your links are still there or, even worse, the entire site is broken it’s time to start from the top. Check your code to make sure you have added it to the functions.php file correctly. Look again at the server to confirm the child theme’s files are uploaded properly.
Assuming everything went well it’s time to pat yourself on the back. You made a code change to your WooCommerce site on your own. You did it the safe way, with a child theme, and learned how to upload files directly to your server.