How to Remove WooCommerce Admin Menus
 Tired of struggling with your product descriptions? ProductWriter.ai can use your existing data and the
power of artificial intelligence to write high-quality product descriptions for you in seconds. Get started for free!
Recently, WooCommerce has been updated with a lot of useful new admin features. There are improved dashboards, order screens, and items have been shifted to new places. For the most part, these are all welcome changes and additions to WooCommerce. The admin aspect of the world’s most popular e-commerce solution had become quite stale over the years. Unfortunately, these changes are not for everyone. Many store owners are looking for a way to remove WooCommerce admin menus that are new and unwanted.
Thankfully, you can certainly remove these new menu items. In particular, the Analytics and Marketing options are the ones people find the most annoying. Removing these particular WooCommerce admin menus can clean up the interface a bit for you and make things easier to work with.
You can try and hire someone to write some code to remove these menu items for you. They’ll need to either modify your theme, create a tiny custom plugin, or install a more complicated plugin that handles many different admin-level changes. Or you can try and do it on your own. We’ll show you how to handle this task by yourself. Then we’ll show you how to purchase our plugin for an easier solution that is much faster and less technical.
How to Hide WooCommerce Admin Menus with Code
We’re about to go over the way to write working code to impact your WooCommerce site. This is going to fundamentally change the way your WordPress admin operates. By the end, you’ll have modified your site’s theme to include our admin menu removal code.
Warning! Make a complete backup of your store’s website before starting this process. This is a minor modification but if things go wrong you want to be prepared. It’s common for novices to make a simple typing error that can bring an entire site down instantly. Stay safe and have a backup of your entire site just in case something bad happens.
Make a Child Theme
We recommend doing this code change through your theme. Even though we’re about to modify the admin it’s simpler to do it this way for most people. Of course, you never want to add code right to your theme’s main files. Thankfully, we can use the child theme system baked into WordPress. A child theme inherits code from your original, or parent, theme. When the parent theme receives an update this system prevents your code changes from being overwritten and lost. You can easily find a WordPress child theme tutorial to get you set up and ready to add your own code in the following steps.
Add Code to the Child Theme
With your child theme made it is time to add code to it. Every WordPress theme should have inside of it a file called funcitons.php. This is the file where you can easily add code snippets. Make the funcitons.php file in your child theme’s directory and then open it in a text editor. You’ll want to add the following lines of code to remove WordPress admin menus for Analytics and Marketing.
add_filter( 'woocommerce_admin_features', 'my_remove_admin_menus' );
function my_remove_admin_menus($features) {
    $analytics = array_search('analytics', $features);
    unset($features[$analytics]);

    $marketing = array_search('marketing', $features);
    unset($features[$marketing]);

    return $features;
}
Save the functions.php file when you are done inserting the above code. If you want to keep one of the menu items, just remove its part from the code and keep the rest.
Does the code part not make sense? Child themes, and coding, can be too intimidating to a lot of people. We haven’t even told you how to upload your child theme yet. If you would rather have this done for you we have a plugin you can use. Learn how our plugin can help you save time.
Upload Your Child Theme
Ok, your child theme is done but it’s not on your site yet. It’s time to upload it to your server so you can ultimately activate it. The easiest way to handle this is right inside of the WordPress admin area. First, compress your child theme into a .zip file. Next, head over to the Appearance area of the WordPress admin and upload your file via the Themes section.
You can also upload your child theme using an FTP program. You can find dozens of FTP programs online and many of them are free. They can be a little tricky to set up though. You’ll need to know information about how to log in to your hosting provider’s server. If you want to try this, and need help, contact your hosting provider’s support staff or knowledge base for more information.
Activate the Child Theme
The final step! Your child theme is successfully uploaded if you can see it under the Appearance section of the WordPress admin. If you don’t see your child theme then you need to try and upload it again. Something went wrong during the process.
You should see an activation button next to your child theme after it is successfully uploaded. Clicking on that button should turn everything on, including your changes. You should immediately notice that you have finally taken care of our initial goal: to remove the WordPress admin menus you found unnecessary. If the menus are still there, or disaster has struck and your site is broken, you made a mistake with your code somewhere. Go back into your child theme’s functions.php file and try and see where you make the mistake. When it’s fixed you will have to repeat the upload and activation process again.
In the end, you will work it out and have things running properly. Of course, this was a ton of work for something so simple, right? You can pay someone to do this for you if you would prefer. The rates and time WooCommerce developers charge vary. Or, if you want to take care of this now, without finding help check out our easier solution.
Disable WooCommerce Admin Menus the Easy Way
We have developed a simple plugin that lets you remove WooCommerce admin menus on your own. The plugin is very simple to use and doesn’t require any of the work we discussed above.
Purchasing and installing our plugin is very easy. There’s no messy business of making your own WordPress child theme. You don’t need to write or copy and paste any code. So that means you don’t need to use a text editor or compress a folder into a .zip file. The plugin is simple and easy to install and activate. We will send you complete instructions on how to install the plugin after you complete your purchase. The whole process will take you less than a minute.
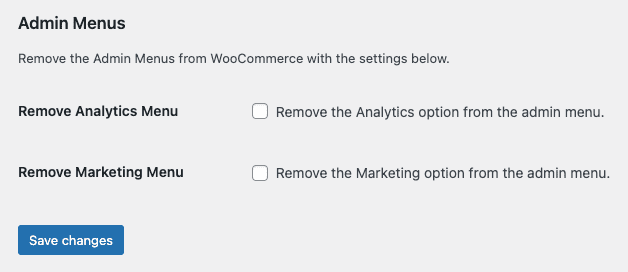
After installation, you’ll discover a Remove Features tab on the WooCommerce settings page. This is where you can decide exactly which admin menus to remove.

There’s nothing else to do. Simply click a checkbox or two then save your changes. The admin menus you selected will be removed the next time you load the WordPress admin.
When you purchase our plugin you get:
- 90 days of support. Get help with your plugin up to three months after purchase.
- No license keys or yearly subscriptions. Pay $14 once.
- Unlimited installations. Install the plugin on as many sites as you want.
We offer a 14-day money-back guarantee. Get a full refund if you are unhappy with our plugin or if it doesn’t meet your expectations.